Plant Propagation / Hanging Wall Vase / Upcycled Craft
I love freshly grown herbs, but I am terrible at growing anything from seeds, so I buy new herb plants every spring only to watch them die off in the fall.
Did you know that some plants can be grown from leaf clippings? I had never tried it. So, I was super happy to find out how easy it is to start plant clippings in water. Plus, it’s free, which is another bonus. So I am hooked.
The problem was the unsightly bottles I used to stick my leaf cuttings in.

So I set out to design a more attractive way to propagate my plants with recycled materials. I love to make all kinds of upcycled crafts, so I hope you check out some of my other projects.
A year or so ago, part of our wood fence got blown down by the wind and needed to be replaced. But, me being me, I couldn’t part with the old fence posts. It turns out they were the perfect base for my wall hangers. So now, of course, I am vindicated for holding on to them for so long. 🙂

The first step was to cut the wood to the proper length. Then I gathered up the rest of the supplies.
Don’t be intimidated by the long list. If you don’t already have some of these tools and supplies, most of them are less than 15 dollars and worth the investment. Also, if you like being crafty, you will undoubtedly use them again and again.

Advertising Disclosure: Upcycle Design Lab may be compensated in exchange for featured placement of certain sponsored products and services or your clicking on links posted on this website.
- Wood Fence Post Cut to Length
- Gloves
- Sand Paper
- Craft Scissors
- Straight Cut Scissor Tin Snips
- One 1 1/2″ L Bracket
- Six Small Screws
- Screw Driver
- Two 3/16″ Pop Rivets
- Two Pop Can Pull Tabs
- Two #10 Size Washers
- Tape Measure
- Needle Nose Pliers
- Crescent Pliers
- Center Punch
- Cordless Drill with 3/16″ and 3/32″ Size Drill Bits
- Rivet Gun
- Safety Can Opener
- Twine
- Paint Brush
- Minwax Polycrylic
- Empty Tabasco Bottle
- Empty 22oz Tin Can Opened with Safety Can Opener (Rusting is optional)
If you would like a quick way to rust tin cans you can check out the following video.
After the fence pieces are cut, they need to be sanded.
Then one edge of the tin can lid is cut off using the tin snips to make a flat edge. The L bracket is used as a template to mark the drill holes using the center punch. Once the tin can is marked, the holes can be drilled with the 3/16″ drill bit.

The next step is to use the rivets and rivet gun to attach the L bracket to the tin can lid.

If you have never used a rivet gun but are interested in learning, here is a video that might interest you.
The hooks are attached to the back before assembling the front of the hanger, using the pull tabs, #10 washers, twine, and small screws.

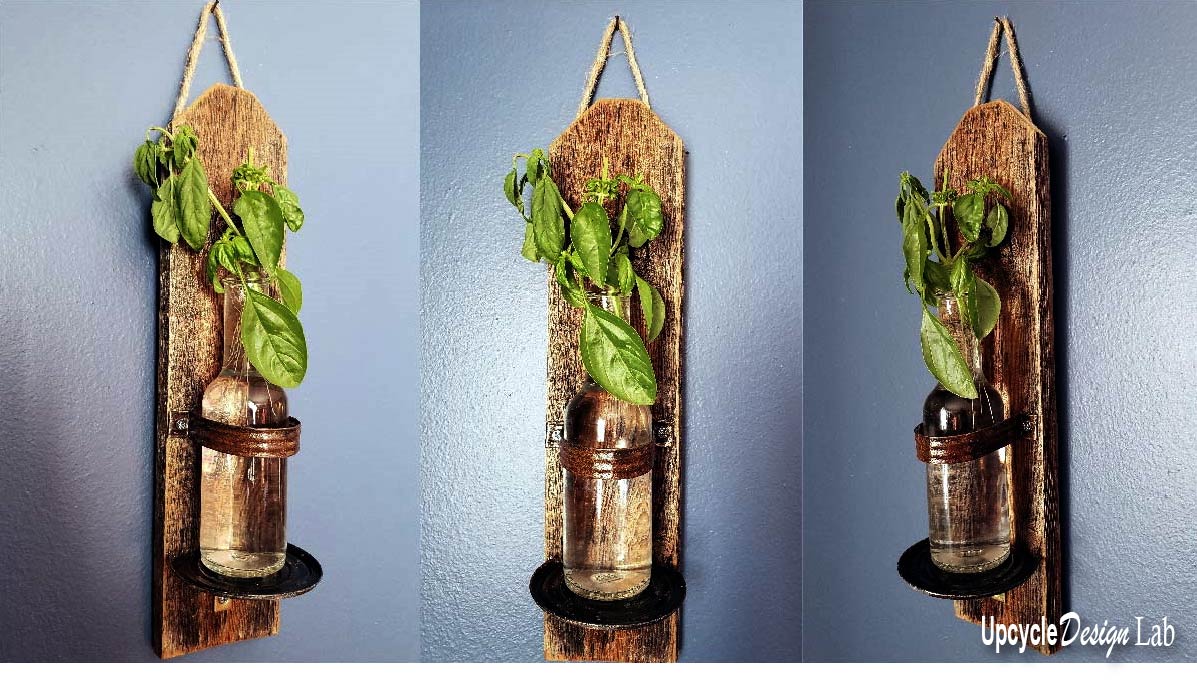
To make the strapping piece that holds the bottle on, I cut a strip of the tin can and then folded and shaped it, using the crescent and needle-nose pliers.


Once the tin can pieces are cut and shaped, they can be attached to the wood using the center punch, the drill with the 3/32″ drill bit, and four small screws.

The final step is to brush on a coat of Minwax polycrylic to seal the metal and the wood.

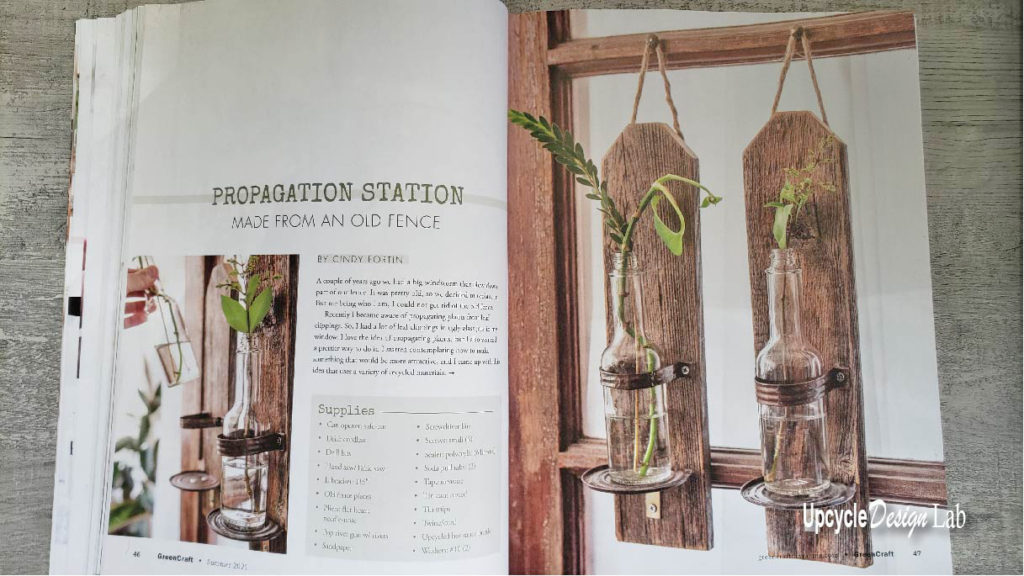
Insert the bottle, and your plant hanger is ready to go.

If you want more details on this project, you can watch the full tutorial below. Thanks so much for stopping by.
Happy Upcycling,
Cindy
This project was featured in Green Craft Magazine.
Advertising Disclosure: Upcycle Design Lab may be compensated in exchange for featured placement of certain sponsored products and services or your clicking on links posted on this website.


